For as long as I’ve had my home lab setup, I’ve had some way of remotely connecting into it via a VPN.
Things all started with an OpenVPN server running in a VM (and some port forwarding magic) but as I’ve migrated over to newer (and simpler) VPN solutions, there is one thing that was always there – a Static IP.
In practice, Dynamic IPs don’t change often but can change at any time. The simplicity of not having to worry about this (and have to change configurations accordingly) meant a Static IP was essential.
Not all ISPs, especially those for home users, supported Static IP facilities at all – and those were usually niche suppliers and/or higher costing services.
In the last couple of years, possibly in part due to the IPv4 pool shortages, this small pool has further diminished. This includes my current supplier, who is no longer offering new customers a Static IP option. It remains for existing customers at the moment (including myself), but it is only a matter of time before this changes.
Another solution is needed.
Dynamic DNS
The obvious option, which often gets suggested is Dynamic DNS (DDNS). This creates a hostname and links it to your Dynamic IP (which must be updated if it changes).
There are many services which offer this both free/commercially, you’d set-up an account and be provided with a hostname (usually a subdomain under the domain of the service) and some software/configurations to handle updates.
There is another option if you have a Ubiquiti setup and cPanel hosting service for your domain.
To do this you need the following:
- A Ubiquiti router – it needs to handle the connection to your ISP directly (I have a Ubiquiti Cloud Gateway Ultra)
- A cPanel based hosting service – it needs to be managing the DNS of your domain name, it also needs to be enabled by your hosting service. If you see the Dynamic DNS option you should be good.
Setting up a Dynamic DNS sub-domain
To setup a Dynamic DNS domain, it’s really simple.
In the Dynamic DNS option, create a new domain:
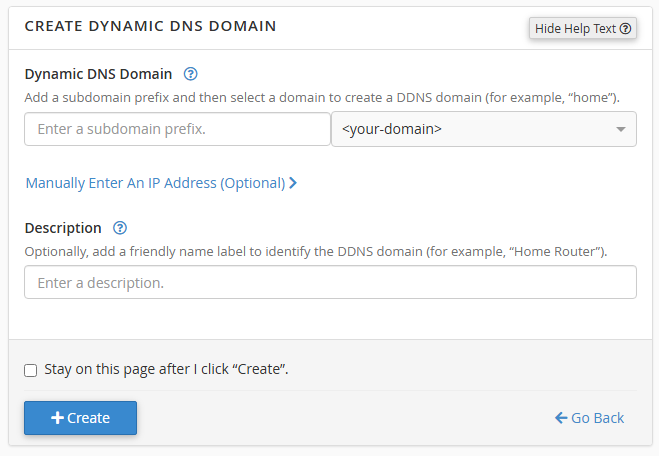
Make sure to leave the optional IP field blank – this should be populated automatically in the next step and should allow you to check the configuration is working.
When done, the entry will be created with an IP listed as None and you should see a URL in the format:
https://<domain-name>/cpanelwebcall/<long-string-of-characters>
Keep this handy as you’ll need it in the next step.
Setting up Dynamic DNS in Ubiquiti
To setup the Dynamic DNS link, in your Unifi Controller interface go to Settings. Click on Internet, then click on your WAN interface (the one your internet is on).
In this screen find the Dynamic DNS option on the screen and open the dialog to add a new entry. In the screen, select Custom for the Service type and fill in the details as follows:

- Hostname – this should be the part of the URL after the domain name
- Username/Password – this can be anything as it’s isn’t used (but is required)
- Server – this should be the domain name the Dynamic DNS will be on (from the URL) – don’t include the https:// prefix.
When done click Create and then Apply Settings at the bottom. This should automatically trigger a push of the IP to the DDNS service and an update whenever the IP changes.
To check this worked, look at the Dynamic DNS screen in cPanel and the None in the IP field should have changed to your external IP. You can also perform an nslookup on your DDNS domain and confirm your external IP is returned (this may take a bit of time to propagate).